Batch Processing with Spring Cloud Task
In this guide, we develop a Spring Boot application that uses Spring Cloud Task and deploy it to Cloud Foundry, Kubernetes, and your local machine. In another guide, we deploy the Task application by using Data Flow.
The following sections describe how to build this application from scratch. If you prefer, you can download a zip file that contains the sources for the application (called billsetup), unzip it, and proceed to the deployment step.
You can download the project from your browser or by running the following command, from the command-line:
wget https://github.com/spring-cloud/spring-cloud-dataflow-samples/blob/master/dataflow-website/batch-developer-guides/batch/batchsamples/dist/batchsamples.zip?raw=true -O batchsamples.zipDevelopment
We start from the Spring Initializr and create a Spring Cloud Task application.
Suppose a cell phone data provider needs to create billing statements for customers. The usage data is stored in JSON files that are stored on the file system. The billing solution must pull data from these files, generate the billing data from this usage data, and store it in a BILLING_STATEMENTS table.
For this example, we break up the solution into two phases:
billsetuptask: Thebillsetuptaskapplication is a Spring Boot application that uses Spring Cloud Task to create theBILL_STATEMENTStable.billrun: Thebillrunapplication is a Spring Boot application that uses Spring Cloud Task and Spring Batch to read usage data and price for each row from a JSON file and put the resulting data into theBILL_STATEMENTStable.
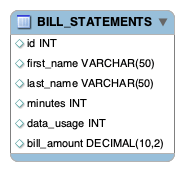
For this section, we create a Spring Cloud Task and Boot application that creates the BILL_STATEMENTS table that are used by the BillRun application. The following image shows the BILL_STATEMENTS table:

Initializr
You can either directly download the project generated by the Spring Initialzr or visit the Spring Initializr site and follow these instructions:
- Visit the Spring Initialzr site.
- Select the latest release of Spring Boot.
- Create a new Maven project with a Group name of
io.springand an Artifact name ofbillsetuptask. - In the Dependencies text box, type
taskand then select the Cloud Task dependency. - In the Dependencies text box, type
jdbcand then select the JDBC dependency. - In the Dependencies text box, type
h2and then select the H2 dependency. We use H2 for unit testing. - In the Dependencies text box, type
mysqland then select the MySQL dependency(or your favorite database). We use MySQL for the runtime database. - Click the Generate Project button.
Now you should unzip the billsetuptask.zip file and import the project into your favorite IDE.
Setting up MySql
If you do not have an instance of MySQL available to you, you can follow these instructions to run a MySQL docker image for this example:
-
Pull a MySQL docker image by running the following command:
docker pull mysql:5.7.25 -
Start MySQL by running the following command:
docker run -p 3306:3306 --name mysql -e MYSQL_ROOT_PASSWORD=password \
-e MYSQL_DATABASE=task -d mysql:5.7.25
Building the Application
Now we can create the code required for this application. To do so:
- Create the
io.spring.billsetuptask.configurationpackage. - In the
io.spring.billsetuptask.configurationpackage, create aTaskConfigurationclass that resembles the following listing:
@Configuration
@EnableTask
public class TaskConfiguration {

    @Autowired
    private DataSource dataSource;

    @Bean
    public CommandLineRunner commandLineRunner() {
        return args -> {
            JdbcTemplate jdbcTemplate = new JdbcTemplate(dataSource);
            jdbcTemplate.execute("CREATE TABLE IF NOT EXISTS " +
                    "BILL_STATEMENTS ( id int, " +
                    "first_name varchar(50), last_name varchar(50), " +
                    "minutes int,data_usage int, bill_amount double)");
        };
    }
}
The @EnableTask annotation sets up a TaskRepository, which stores information about the task execution (such as the start and end time of the task and the exit code).
Testing
Now we can create our test. To do so, update the contents of BillsetuptaskApplicationTests.java with the following code:
package io.spring.billsetuptask;

import org.junit.jupiter.api.Test;
import org.springframework.beans.factory.annotation.Autowired;
import org.springframework.boot.test.context.SpringBootTest;
import org.springframework.jdbc.core.JdbcTemplate;

import javax.sql.DataSource;

import static org.assertj.core.api.Assertions.assertThat;

@SpringBootTest
class BillSetupTaskApplicationTests {

	@Autowired
	private DataSource dataSource;

	@Test
	public void testRepository() {
		JdbcTemplate jdbcTemplate = new JdbcTemplate(this.dataSource);
		int result = jdbcTemplate.queryForObject(
				"SELECT COUNT(*) FROM BILL_STATEMENTS", Integer.class);
		assertThat(result).isEqualTo(0);
	}

}
Run this test in your IDE. Since Spring Boot's spring.datasource properties are not set, the test runs against the embedded H2 database. In the next step, you can deploy the application and target a MySQL database.
Deployment
In this section, we deploy the task application to the local machine, Cloud Foundry, and Kubernetes.
Local
Now we can build the project. To do so:
- From the command line, change directory to the location of your project and build the project by running the following Maven command:
./mvnw clean package -
Run the application with the configuration required to create the
BILL_STATEMENTStable in the MySQL database. To configure how thebillsetuptaskapplication runs, you can use the following arguments:spring.datasource.url: Set the URL to your database instance. In the following sample, we connect to a MySQLtaskdatabase on our local machine at port 3306.spring.datasource.username: The user name to be used for the MySQL database. In the following sample, it isroot.spring.datasource.password: The password to be used for the MySQL database. In the following sample. it ispassword.spring.datasource.driverClassName: The driver to use to connect to the MySQL database. In the following sample, it iscom.mysql.cj.jdbc.Driver.
The following command runs the
billsetuptaskapplication with our database connection values:java -jar target/billsetuptask-0.0.1-SNAPSHOT.jar \ '--spring.datasource.url=jdbc:mysql://localhost:3306/task?useSSL=false' \ --spring.datasource.username=root \ --spring.datasource.password=password \ --spring.datasource.driverClassName=com.mysql.cj.jdbc.DriverAlternatively, you can place these properties in
application.propertiesand run theBillSetupTaskApplicationfrom your IDE.
Viewing the Results of Task Execution in the Database
Spring Cloud Task records all task executions to a table called TASK_EXECUTION.
Here is some of the information that is recorded by Spring Cloud Task:
START_TIME: The time at which the task execution startedEND_TIME: The time at which the task execution completedTASK_NAME: The name associated with the task executionEXIT_CODE: The exit code that was returned by the task executionEXIT_MESSAGE: The exit message that was returned for the executionERROR_MESSAGE: The error message (if any) that was returned for the executionEXTERNAL_EXECUTION_ID: An ID to be associated with the task execution
By default, the TASK_NAME is application.
You can use the use the following commands to query the TASK_EXECUTION table:
$ docker exec -it mysql bash -l
# mysql -u root -ppassword
mysql> select * from task.TASK_EXECUTION;
The results should resemble the following output:
| TASK_EXECUTION_ID | START_TIME          | END_TIME            | TASK_NAME       | EXIT_CODE | EXIT_MESSAGE | ERROR_MESSAGE | LAST_UPDATED        | EXTERNAL_EXECUTION_ID | PARENT_EXECUTION_ID |
|-------------------|---------------------|---------------------|-----------------|-----------|--------------|---------------|---------------------|-----------------------|---------------------|
|                 1 | 2019-04-23 18:10:57 | 2019-04-23 18:10:57 | application     |         0 | NULL         | NULL          | 2019-04-23 18:10:57 | NULL                  |                NULL |
Setting the Application Name for Task Execution
In the previous table, the TASK_NAME column has the default value of application.
Spring Cloud Task lets us change this setting by using the spring.cloud.task.name. To do so, we add that property to our next run, as follows:
java -jar target/billsetuptask-0.0.1-SNAPSHOT.jar \
--spring.datasource.url=jdbc:mysql://localhost:3306/task?useSSL=false \
--spring.datasource.username=root \
--spring.datasource.password=password \
--spring.datasource.driverClassName=com.mysql.cj.jdbc.Driver \
--spring.cloud.task.name=BillSetupTest1
Now, when you query the table, you can see that the last task run in the query now has a name of BillSetupTest1.
Cleanup
To stop and remove the MySQL container that is running in the docker instance, run the following command:
docker stop mysql
docker rm mysql
Cloud Foundry
This guide walks through how to deploy and run simple spring-cloud-task stand-alone applications to Cloud Foundry.
Requirements
On your local machine, you need to have installed the following:
- Java
- Git
You also need to have installed the Cloud Foundry command line interface (see the documentation).
Building the Application
Now we can build the project.
To do so, from a command line, change directory to the location of your project and build the project by running the following Maven command: ./mvnw clean package
Setting up Cloud Foundry
First, you need a Cloud Foundry account. You can create a free account by using Pivotal Web Services (PWS). We use PWS for this example. If you use a different provider, your experience may slightly vary from this description.
To log into Cloud Foundry from the Cloud Foundry command line interface, run the following command:
cf loginYou can also target specific Cloud Foundry instances with the -a flag — for example, cf login -a https://api.run.pivotal.io.
Before you push an application, you should also ensure that you setup the MySQL Service on Cloud Foundry. You can check what services are available by running the following command:
cf marketplaceOn Pivotal Web Services (PWS), you should be able to use the following command to install the MySQL service:
cf create-service cleardb spark task-example-mysqlMake sure you name your MySQL service task-example-mysql. The rest of this example uses that value.
Task Concepts in Cloud Foundry
To provide configuration parameters for Cloud Foundry, we create dedicated manifest YAML files for each application.
For additional information on setting up a manifest, see the Cloud Foundry documentation
Running tasks on Cloud Foundry is a two-stage process. Before you can actually run any tasks, you need to first push an app that is staged without any running instances. We provide the following common properties to the manifest YAML file to each application:
memory: 32M
health-check-type: process
no-route: true
instances: 0
The key is to set the instances property to 0. Doing so ensures that the application is staged without actually being run. We also do not need a route to be created and can set no-route to true.
Having this app staged but not running has a second advantage as well. Not only do we need this staged application to run a task in a subsequent step, but, if our database service is internal (part of your Cloud Foundry instance), we can use this application to establish an SSH tunnel to the associated MySQL database service to see the persisted data. We go into the details for that later in this document.
Running billsetuptask on Cloud Foundry
To deploy the first task application (billsetuptask), you must create a file named manifest-billsetuptask.yml with the following contents:
applications:
  - name: billsetuptask
    memory: 32M
    health-check-type: process
    no-route: true
    instances: 0
    disk_quota: 1G
    timeout: 180
    buildpacks:
      - java_buildpack
    path: target/billsetuptask-0.0.1-SNAPSHOT.jar
    services:
      - task-example-mysql
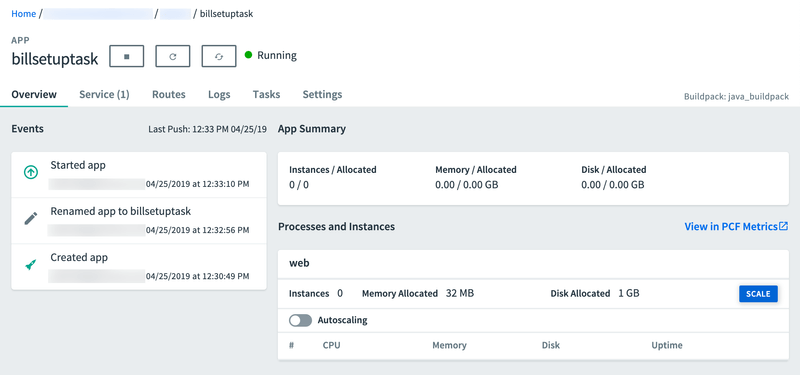
Now you can run cf push -f ./manifest-billsetuptask.yml. Doing so stages the application, and the application should be up. You can verify that the application is up in the Cloud Foundry dashboard, as follows:

You can now run the task. To do so:
cf run-task billsetuptask ".java-buildpack/open_jdk_jre/bin/java org.springframework.boot.loader.JarLauncher arg1" --name billsetuptask-taskYou can specify the following optional arguments:
-kDisk limit (e.g. 256M, 1024M, 1G)-mMemory limit (e.g. 256M, 1024M, 1G)
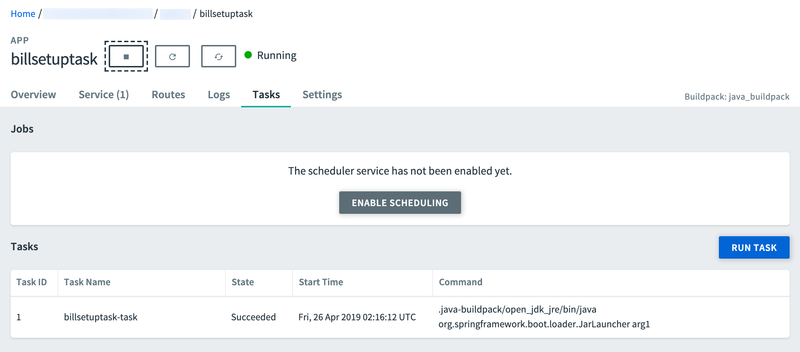
The task should execute successfuly. You can verify the results in the Cloud Foundry dashboard by clicking on the Task tab, as follows:

In the Tasks table, you should see your task billsetuptask with a State of Succeeded, as follows:

Removing All Task Applications and Services
With the conclusion of this example, if you do not plan to proceed to the Spring Batch example, you may want to remove all instances on Cloud Foundry. To do so, run the following commands:
cf delete billsetuptask -f
cf delete-service task-example-mysql -f
Kubernetes
This section walks through how to deploy and run a simple spring-cloud-task application on Kubernetes.
We deploy the billsetuptask sample application to Kubernetes.
Setting up the Kubernetes Cluster
We need a running Kubernetes cluster. For this example, we deploy to minikube.
Verifying that Minikube is Running
To verify that Minikube is running, run the following command (shown with its output):
$ minikube status

host: Running
kubelet: Running
apiserver: Running
kubectl: Correctly Configured: pointing to minikube-vm at 192.168.99.100
Installing the Database
You need to install a MySQL server by using the default configuration from Spring Cloud Data Flow. To do so, run the following command:
kubectl apply -f https://raw.githubusercontent.com/spring-cloud/spring-cloud-dataflow/v2.8.4/src/kubernetes/mysql/mysql-deployment.yaml \
-f https://raw.githubusercontent.com/spring-cloud/spring-cloud-dataflow/v2.8.4/src/kubernetes/mysql/mysql-pvc.yaml \
-f https://raw.githubusercontent.com/spring-cloud/spring-cloud-dataflow/v2.8.4/src/kubernetes/mysql/mysql-secrets.yaml \
-f https://raw.githubusercontent.com/spring-cloud/spring-cloud-dataflow/v2.8.4/src/kubernetes/mysql/mysql-svc.yaml
Building a Docker image
We need to build the docker image for the billsetuptask application. To do so, we use the jib Maven plugin. If you downloaded the source distribution, the jib plugin is already configured. If you built the apps from scratch, add the following under plugins in pom.xml:
<plugin>
    <groupId>com.google.cloud.tools</groupId>
    <artifactId>jib-maven-plugin</artifactId>
    <version>0.10.1</version>
    <configuration>
        <from>
            <image>springcloud/openjdk</image>
        </from>
        <to>
            <image>${docker.org}/${project.artifactId}:${docker.version}</image>
        </to>
        <container>
            <useCurrentTimestamp>true</useCurrentTimestamp>
        </container>
    </configuration>
</plugin>
Then add the referenced properties under properties. For this example, we use the following properties:
<docker.org>springcloudtask</docker.org>
<docker.version>${project.version}</docker.version>
Now you can add the image to the minikube Docker registry. To do so, run the following commands:
eval $(minikube docker-env)
./mvnw clean package jib:dockerBuild
You can run the following command to verify its presence (by finding springcloudtask/billsetuptask in the resulting list of images):
docker imagesSpring Cloud Data Flow has tested containers created by Spring Boot's gradle/maven plugin, jib maven plugin, and the docker build command.
Deploying the Application
The simplest way to deploy a task application is as a standalone Pod. Deploying tasks as a Job or CronJob is considered best practice for production environments but is beyond the scope of this guide.
First, save the following content to task-app.yaml:
apiVersion: v1
kind: Pod
metadata:
  name: billsetuptask
spec:
  restartPolicy: Never
  containers:
    - name: task
      image: springcloudtask/billsetuptask:0.0.1-SNAPSHOT
      env:
        - name: SPRING_DATASOURCE_PASSWORD
          valueFrom:
            secretKeyRef:
              name: mysql
              key: mysql-root-password
        - name: SPRING_DATASOURCE_URL
          value: jdbc:mysql://mysql:3306/task
        - name: SPRING_DATASOURCE_USERNAME
          value: root
        - name: SPRING_DATASOURCE_DRIVER_CLASS_NAME
          value: com.mysql.cj.jdbc.Driver
  initContainers:
    - name: init-mysql-database
      image: mysql:5.6
      env:
        - name: MYSQL_PWD
          valueFrom:
            secretKeyRef:
              name: mysql
              key: mysql-root-password
      command:
        [
          'sh',
          '-c',
          'mysql -h mysql -u root -e "CREATE DATABASE IF NOT EXISTS task;"',
        ]
Now you can start the application by running the following command:
kubectl apply -f task-app.yamlWhen the task is complete, you should see output that resembles the following:
$ kubectl get pods
NAME                     READY   STATUS      RESTARTS   AGE
mysql-5cbb6c49f7-ntg2l   1/1     Running     0          4h
billsetuptask            0/1     Completed   0          81s
Once you are satisfied with the results, you can delete the pod. To do so, run the following command:
kubectl delete -f task-app.yamlNow you can examine the database to see the results of running the application. To do so,
log in to the mysql container and query the TASK_EXECUTION table.
Get the name of the MySQL pod by running kubectl get pods, as shown earlier.
Then you need to log in, as follows:
$ kubectl exec -it mysql-5cbb6c49f7-ntg2l -- /bin/bash
# mysql -u root -p$MYSQL_ROOT_PASSWORD
mysql> select * from task.TASK_EXECUTION;
To uninstall mysql, run the following command:
kubectl delete all -l app=mysqlWhat's Next?
Congratulations! You have created and deployed a Spring Cloud Task application. Now you can go on to the next section and create a Spring Batch Application.