Setting up Cloud Foundry to Launch Tasks
To run the two task applications by using Spring Cloud Data Flow, we also set up the following two server instances on Cloud Foundry:
To download Spring Cloud Data Flow, run the following command:
wget https://repo.spring.io/milestone/org/springframework/cloud/spring-cloud-dataflow-server/2.1.0.M1/spring-cloud-dataflow-server-2.1.0.M1.jarTo download Spring Cloud Skipper, run the following command:
wget https://repo.spring.io/milestone/org/springframework/cloud/spring-cloud-skipper-server/2.0.2.RC1/spring-cloud-skipper-server-2.0.2.RC1.jarLater in this document, we describe how to deploy those two jars to Cloud Foundry.
Setting up Services
To set up services, you first need a Cloud Foundry account. You can create a free account by using Pivotal Web Services (PWS). We use PWS for this example. If you use a different provider, your experience may differ slightly from the experience described in this document.
Once you have an account, to log into Cloud Foundry by using the Cloud Foundry command line interface, run the following command:
cf loginYou can also target specific Cloud Foundry instances with the -a flag — for example, cf login -a https://api.run.pivotal.io.
We use the following Cloud Foundry services:
- PostgreSQL
- RabbitMQ
RabbitMQ is not strictly needed, but, if we continue on to work with Streams, we want to be good citizens.
You can get a listing of available services on Cloud by using the marketplace command, as follows:
cf marketplaceOn Pivotal Web Services (PWS), you should be able to use the following commands to install the PostgreSQL service and the RabbitMQ service:
cf create-service elephantsql panda postgres-service
cf create-service cloudamqp lemur rabbitmq-serviceIMPORTANT: When choosing a Postgres service, keep an eye on the provided number of connections. On PWS, for example, the free service tier of elephantsql provides only four parallel database connections, which is too limiting to successfully run this example.
Make sure you name your PostgresSQL service postgres-service. We use that name in the rest of the examples in this document.
Setting up Skipper on Cloud Foundry
This example uses Skipper, which you can set up on Cloud Foundry. To do so:
-
Create a file named
manifest-skipper.ymlwith the following content:applications: - name: skipper-server routes: - route: <your-skipper-server-route> # e.g. my-skipper-server.cfapps.io memory: 1G disk_quota: 1G instances: 1 timeout: 180 buildpacks: - java_buildpack path: ./spring-cloud-skipper-server-2.7.4.jar env: SPRING_APPLICATION_NAME: skipper-server SPRING_PROFILES_ACTIVE: cloud JBP_CONFIG_SPRING_AUTO_RECONFIGURATION: '{enabled: false}' SPRING_DATASOURCE_HIKARI_MINIMUMIDLE: 1 SPRING_DATASOURCE_HIKARI_MAXIMUMPOOLSIZE: 4 SPRING_APPLICATION_JSON: |- { "spring.cloud.skipper.server" : { "platform.cloudfoundry.accounts" : { "default" : { "connection" : { "url" : <cf-api-url>, "domain" : <cf-apps-domain>, "org" : <org>, "space" : <space>, "username": <email>, "password" : <password>, "skipSsValidation" : false }, "deployment" : { "deleteRoutes" : false, "services" : "rabbitmq-service", "enableRandomAppNamePrefix" : false, "memory" : 2048 } } } } } services: - postgres-service - Run
cf push -f ./manifest-skipper.yml.
Setting up Data Flow on Cloud Foundry
This example uses Skipper, which you can set up on Cloud Foundry. To do so:
-
Create a file named
manifest-dataflow.yml:--- applications: - name: data-flow-server routes: - route: <your-data-flow-server-route> # e.g. my-data-flow-server.cfapps.io memory: 2G disk_quota: 2G instances: 1 path: ./spring-cloud-dataflow-server-2.1.0.M1.jar env: SPRING_APPLICATION_NAME: data-flow-server SPRING_PROFILES_ACTIVE: cloud JBP_CONFIG_SPRING_AUTO_RECONFIGURATION: '{enabled: false}' SPRING_CLOUD_SKIPPER_CLIENT_SERVER_URI: https://<skipper-host-name>/api SPRING_APPLICATION_JSON: |- { "maven" : { "remoteRepositories" : { "repo1" : { "url" : "https://repo.spring.io/libs-snapshot" } } }, "spring.cloud.dataflow" : { "task.platform.cloudfoundry.accounts": { "default" : { "connection" : { "url": <cf-api-url>, "domain": <cf-apps-domain>, "org": <org>, "space" : <space>, "username": <email>, "password" : <password>, "skipSsValidation" : true }, "deployment" : { "services" : "postgres-service" } } }, "applicationProperties" : { "task": { "spring.datasource.hikari" : { "minimumIdle" : 1, , "maximumPoolSize" : 2 } } } } } services: - postgres-serviceFor an explanation of the configured properties, see https://docs.spring.io/spring-cloud-dataflow/docs/current/reference/htmlsingle/#\_common\_application_properties
- Run
cf push -f ./manifest-dataflow.yml.
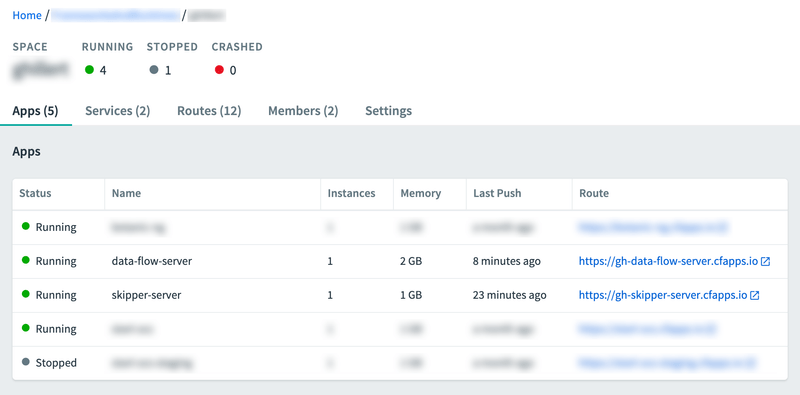
Once you have deployed Spring Cloud Data Flow and Spring Cloud Skipper, go to your Cloud Foundry dashboard. Both Spring Cloud Skipper and Spring Cloud Data Flow should have a status of Running, as follows:
